Showing posts with label Open source. Show all posts

Tuesday, November 30, 2010

Open Source and Freeware

Where to find the best sources to find Open Source and Freeware programs? Yes there are many places out there that have huge lists of free software but how do you know what is good and what isn't? Well a lot of the time you would need to just test them out to see what is best but a lot of us geeks try out many pieces of software and thus can help out other sort through these messes. Below are some links to sites that will have a great deal of programs but are laid out very nicely.

http://ehoffmann.blogsome.com/2005/09/13/sofware-list-for-a-better-computing/

http://osswin.sourceforge.net/

http://thegeekylife.blogspot.com/2010/09/top-10-freeware-programs.html

Wednesday, November 24, 2010

Open Source Windows Programs

The Site I Found While browsing has a very good list of Open-Source Windows programs. If you don't know what open source is you can learn more here: http://en.wikipedia.org/wiki/Open_source.

http://www.opensourcewindows.org/

Another site that has a lot of good "Free" (Non-Open Source) programs.

http://www.filehippo.com/

Thursday, May 7, 2009

Spice Up Firefox With Personas

Are you tired of the plain Firefox look? Then why not spice it up a bit by using Personas. Personas is a utility for Firefox that lets you dress up Firefox by using skins. This Add-On is one of the better ones that I have found for making Firefox look more stylish and can be done in a matter of seconds.

To setup Personas it is really easy you just go to there homepage Here and then click on the Get Personas For Firefox - Free button to download it.


Personas download button

Once you have Personas downloaded and installed you can now go and take a look at there Gallery of skins Here. To preview a skin all that you have to do is scroll over the image of the skin on the Personas Gallery page. Now to set the skin so it stays all you need to do is click on the image. You can also click on View Details and then click on the Wear This button on the next page.


Firefox with skin applied (click on image to view a larger version)

If you can't find what you are looking for in the Gallery you can also make your own skins very easily by just going Here. Once you have signed up you can then see all of the information that you need to upload your own skins. What you will need to create your own is two images (one for the header and one for the footer). The header image needs to be 3000 wide x 200 tall and the footer needs to be 3000 wide x 100 tall. If you need more details on how to create your own you can visit this page Here. Also if you need a free image editing program to create your own skins a very good one is Gimp.

Now you can make Firefox look personalized to who you are in just a few minutes. Have fun and if you have any that you have created don't be afraid to post them up in the comments.

Saturday, December 20, 2008

Open Source Alternative To Microsoft Office

Do you use Microsoft Office in your daily life at work or school but don't have it installed on your home computer because it is too expensive? Well like most other things there is a free alternative to this and it is called OpenOffice.org. This office suite has everything that you will need from writing papers to creating data bases and everything in between that you would need in a office suite. You can download your free copy from here: http://www.openoffice.org. OpenOffice.org has a very nice interface so that if you have used any of the Microsoft Office programs before everything should look very similar or even close to the same. You can also save your files to all of the same formats that a ton of the other office programs use. So you can still send your files to whom ever and they will be able to read them just fine with the programs that they have installed. So if you need an office suite OpenOffice.org is a very good alternative to the Microsoft Office suite if you want to go open source and not have to pay any money.


OpenOffice.org Writer


OpenOffice.org Impress


OpenOffice.org Draw


OpenOffice.org Calc


OpenOffice.org Base

Friday, November 14, 2008

Removing The Background Of A Picture Using GIMP

Have you ever spent a long time trying to delete the background of a image in GIMP or Photoshop and thought that there has to be a faster and easier way. Well there is a method that I use and it seems to be pretty quick and easy enough for most of the projects that I have done. To do this I will be using GIMP so if you do not have it installed already you can get it from here: http://www.gimp.org/.

To start off you will need to open the image that you want to get rid of the background on. To do this you will just need to navigate to File > Open and then just browse to where the image is saved on your hard drive. Once you have the image open you will need to go to the Paths Tool in the Toolbox window it is the that looks like a pen. Now what you will need to do is just click on the border of the image to create a small dot. Then to create a path around the image just click around the image to create a path all the way around. Then once you click back on the first dot it will leave a open space between the last and first dot.


Image with path drawn around it

Now after you have you path around the whole image you will need to go to the Toolbox window and click on the Tool Options tab. You will then need to click on the button that says Selection From Path. This should now make your path into a selection.


Image with a Selection Path around it

Now you just have to press Ctrl + C to copy the selection then press Ctrl + V to paste the image back onto the image that you already have. Now you will have to click on the New Layer button in the Layers tab in the Toolbox window. This will now put your pasted image onto it's own layer. From here you will need to select the background layer and then click on the Delete Layer button. Now you should just have you image with no background.


Image with no background

From here you can be done or you can move on and just copy and paste this image onto another one and resize if needed. If this method does not seem work the greatest for you or if you think that you have a better way on how to do this you can post it in the comments or you can send me an e-mail at thegeekylife@gmail.com. This method does seem to work very well for me though in the past and just remember to have fun with it.


Tuesday, November 4, 2008

Setting Up The Desktop Cube In Ubuntu 8.10

Setting up the Desktop Cube in Ubuntu 8.10 is very easy and quick. The cube is a very nice addition to your Ubuntu install and also is very cool and fun to show to your friends using Windows. So lets get this started.

First you will need to enable Extra in the Visual Effects settings. To do this you will need to right click on the Desktop > Change Desktop Background > Visual Effects tab. Then just click the circle that says Extra. Now just click close.


Extra Effects Enabled

You will now need to install the Compiz configuration settings manager. To do this you will need to open up the Synaptic Package Manager by navigating to System > Administration > Synaptic Package Manager. Now type Compiz in the Quick Search bar. Then mark compizconfig-settings-manager for installation. After that just hit apply and it will now download and install the package.


Synaptic Package Manager

Now you will need to navigate to System > Preferences > Compizconfig Settings Manager. Now you will need to enable the Desktop Cube by putting a check in the little box by Desktop Cube. Then a little box will come up asking if you want to Disable the Desktop Wall and you click Disable Desktop Wall. While you are still in Compizconfig Settings Manager you will also want to put a check in Rotate Cube and Cube Reflection and Deformation. Now to add caps to the cube you will need to double click on Cube Reflection and Deformation.

Cube Reflection and Deformation Settings

Now you will need to click on Appearance and it will then drop down with some settings that you can change. To change the default caps you will need to click on New for the top and bottom caps and all you need to do is browse to a image that you would like to set as the top and bottom cap for your cube.


Appearance Settings Drop Down

Now if you would like to have something other than just the cube you can navigate to the Deformation tab and then from there you can select None, Cylinder, or Sphere from the drop down menu near the top of the window.


Deformation Settings

Now you are done setting up your Cube, Cylinder, or Sphere. There are many other settings that you can play around with but the ones I have shown here are just to get you started. Now to view your new effect you can either hold down Ctrl + Alt then click on the desktop or you can click on the desktop using the middle scroll button on your mouse if you have one. So now go have fun with you new settings and customize it to how you like it.


The Cube


The Cylinder


The Sphere

Friday, October 24, 2008

Customizing Your Ipod With Rockbox

Have you ever wanted more from your Ipod like games or maybe just more options. Well there is something called Rockbox that you will probably like. Rockbox is another operating system that you can install onto you Ipod without having to erase or delete anything from your Ipod. It is a great utility to add to your Ipod and best of all it is free to use. Lets get started then shall we.

First off you will need to goto http://www.rockbox.org/download/ and choose the right kind of Ipod that you have and download the .zip file (you will only have to do this if you are doing the manual install). You will also want to download the manual for your specific Ipod that you have because I only have an Ipod video 30gb so your process may differ from mine just a bit. You will also need to download the Rockbox Utility if you would prefer a graphical install. I am going to cover going both routes in this tutorial (graphical install and manual install).

Now lets get started with the installation process.

Graphical Install:
First you will need to unzip the Rockbox Utility and then double click on the rbutilqt.exe to start it up. You should then see a window come up that looks like the one below.


Rockbox Utility Screen

Now we have to let the program know what kind of device that we want to install Rockbox on. So you will have to navigate to File > Configure. A window should come up then you just have to hit the Autodetect button in the bottom right hand corner. It will then show your device and also the dropdown menu with all of the other Ipod versions in it.


Configuration screen

Now from here you just have to hit OK and it should bring you back to the first screen. Now you have to decide if you will want to do the Complete Installation or the Small Installation. I will be doing the Complete Installation. When you click Complete Installation a dialog box comes up asking if you would like to go through with the install and since you do you will want to click Yes.


Confirm Installation screen

After you click yes it will proceed to install the Bootloader and also download it. After the bootloader is downloaded and installed it will then download the rockbox.zip file and install it. Then the program will download some fonts and install them too.


The Installation screen

Now you are done just click OK and then close out of the Rockbox Utility. Now just unplug your Ipod and it should boot right into Rockbox. So now you are done and you have successfully installed Rockbox onto your Ipod. If you would like to go the other route and do this manually then just keep reading.


Rockbox interface on the Ipod

Manual Install:

To start you will have to unzip your Rockbox.zip file (mine was called rockbox-ipodvideo-3.0.zip yours should be something similar) you will then need to take the unzipped folder (should be .rockbox) and put it in the root directory of your Ipod.


Extracted Rockbox folder

Now you will have to install the bootloader so that you will be able to boot into Rockbox on your Ipod. You will need to download this to install the bootloader: http://download.rockbox.org/bootloader/ipod/ipodpatcher/win32/ipodpatcher.exe. You will then have to run the ipodpatcher.exe. It will open in a command window and will do a scan to find your Ipod.


Command window after scan for Ipod

After the scan you will need to type i then hit enter to install the bootloader. You will then see it start to install and after only a little bit it should be done. You just need to hit enter again to exit the window.


Successfully installed bootloader

Now you are done just eject your Ipod from you computer and it should load right into Rockbox (if it doesn't you may need to hold the middle and menu button in for a couple seconds).


Successfull Rockbox install

Now that you have Rockbox installed on your Ipod you may be wondering if you will still be able to get back into you normal Ipod install. Yes you can and very easily too all you have to do is reset your Ipod by holding in the middle button and menu button and then when you see the Apple logo you need to push the hold switch into the hold position then wait for it to boot into the normal Ipod firmware. Now you have a very customizable Ipod and if you look around on the Rockbox site you will be able to find a ton more goodies to install on it.

Wednesday, October 22, 2008

Intro To The GIMP Image Editor

Have you ever wanted to make those really cool looking photos that others make in Photoshop but don't want to throw down that much cash to do it. Well as with most things there are free alternatives that you can turn to. GIMP (GNU Image Manipulation Program) is a image editor and a very powerful one at that it can do most everything that the highest version of Photoshop can do at the nice price of Free. If you already know how to use Photoshop or have used it many things are very similar which make it very easy to learn and if you have never used it before then this is a good place to start too. So lets get started.

1. If you are using Linux you will probably already have GIMP installed or you can install it from your package manager. If you are on Windows or Mac you will need to download and install it from here: http://www.gimp.org/

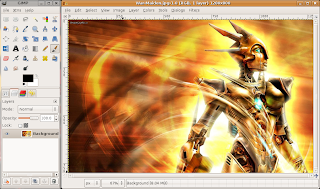
2. Now to get started open up your GIMP. It should load up with a Tip Of The Day window and also a tool bar window. Now to open up a image that we would like to edit we just goto the tool bar window and navigate to file > open. From here you just browse to the image you would like to open and simply click open and it should open you picture in a new separate window.


It should look something like this

3. Now to start editing the image. Lets start with something that everyone will use.

Cropping Tool: To open up your cropping tool right click on your image > Tools > Transform Tools > Crop (shift + C if you like using hot keys). Now you just click and drag the area that you would like to crop. The light area will be what your image will look like after you crop it and the darker area will be the part that will get cut off. If you need to adjust the area just click and drag the edges to where you would like them to be. When you are done and you want to accept the changes you just hit enter.


Before the crop and after the crop

Brightness and Contrast: This is a very simple tool to use and also a very common tool. You can navigate to this tool by right clicking on the image again > Colors > Brightness and Contrast. Then a small window will pop up with some sliders for you brightness and your contrast. To make the image brighter just drag the brightness slider to the right and drag to the left to make it darker. You should see your image changing when you are moving the sliders around if it is not you make need to put a tick in the preview box. Then when you have your values that you want you just click OK to apply the changes.


Brightness and contrast pop up box

Those are just a small portion of the tools that come with GIMP but if you play around with it a bit you will be able to learn to do a ton of different things. The tools listed above should just get you started with cleaning up some of your photos that you have taken. If you would like to learn more about GIMP you should take a look at these tutorials here: http://meetthegimp.org/. I have learned a wealth of information from those tutorials. Just remember to have fun and be creative.