Saturday, December 20, 2008

Open Source Alternative To Microsoft Office

Do you use Microsoft Office in your daily life at work or school but don't have it installed on your home computer because it is too expensive? Well like most other things there is a free alternative to this and it is called OpenOffice.org. This office suite has everything that you will need from writing papers to creating data bases and everything in between that you would need in a office suite. You can download your free copy from here: http://www.openoffice.org. OpenOffice.org has a very nice interface so that if you have used any of the Microsoft Office programs before everything should look very similar or even close to the same. You can also save your files to all of the same formats that a ton of the other office programs use. So you can still send your files to whom ever and they will be able to read them just fine with the programs that they have installed. So if you need an office suite OpenOffice.org is a very good alternative to the Microsoft Office suite if you want to go open source and not have to pay any money.


OpenOffice.org Writer


OpenOffice.org Impress


OpenOffice.org Draw


OpenOffice.org Calc


OpenOffice.org Base

Friday, December 19, 2008

Find New Websites Using Stumble Upon

Have you ever found yourself bored or just having some extra time on your hands? There is a Firefox Add-On to suit your needs and it is called Stumble Upon. It can be downloaded from here: https://addons.mozilla.org/en-US/firefox/addon/138. Also if you do not have Firefox installed you can download it from here: http://www.mozilla.com/en-US/firefox/. To add this to Firefox all you will need to do is just click on the Add to Firefox Button on the Stumble Upon download page. All you will need to do after it is installed in Firefox make an account. Then from there choose the kinds of content that you would like to see then just start stumbling around the web. By clicking on the thumbs up and thumbs down buttons in the toolbar Stumble Upon will be able to show you more sites that will like better and also know what you don't like as well. I can assure you that you will have hours of fun browsing the web and finding a ton of new sites along the way.

Monday, December 1, 2008

Back-up Songs From Your Ipod To Your Computer In Windows

Have you ever wanted to take the songs from your Ipod and put them onto your computer? You may need to do this some time if your hard drive crashes and you lose all of your data and do not want to have to spend all of the hours recopying your whole cd collection back to your computer. There is a free tool that can make this task very easy and it is called iDump this can be downloaded from here: http://www.softpedia.com/get/IPOD-TOOLS/Multimedia-IPOD-tools/iDump.shtml. Now all you will need to do is just download and install the program and then start it up. After you have that completed you can get started with this tutorial.

First you want to make sure that you have your Ipod plugged in to your computer. Other wise you will not get anywhere and the program will not open either. Once it is started up it will load all of your songs. After it is done loading the songs you have there are a couple options that you can select from the drop down menu. You can select from the different playlists that that you have created on your ipod and select songs from there or you can just leave it on the all songs selection. Now you can select the songs to be copied by selecting them one by one or you can right click and choose select all if you just want to get all of the songs from your Ipod.

Selecting songs to be copied

Now that you have all of the songs selected that you would like to copy to your computer you can now select where you would like the songs to be copied to on your computer. To do this you will need to click on the Output Options tab toward the top of the window. From here you can just browse to the directory that you would like to copy to. I have just set mine to a music folder on my desktop but you can copy them to where ever you choose. You can also change how the folders will be laid out in the directory that you choose by changing the File Output Format. I have just left mine on the default option because that is just the way that I like my folders to be sorted but you can choose to change yours as you choose. You can also select the Unattended transfer so then you will not have to monitor the whole process of your songs being copied.


Output Options window

Now to copy the songs to your computer all you will have to do is go back to the Ipod tab and then just click on the Start Copy button. Now all you will have to do is just wait for all of the songs to be copied and then you can transfer them to your Itunes or what ever other music player that you have installed. Now you will not have to worry about loosing all of the songs on your ipod and not being able to get them back onto your computer without spending hours.

Songs being copied to computer

Sunday, November 23, 2008

Installing Telnet In Windows Vista

So the other day when I was booted into Windows Vista I wanted to play some old BBS games that I haven't played in a while using Telnet. This is where I noticed that Telnet isn't installed automatically in Vista like it is in XP. This is a very simple fix though and can be done in a matter of just a couple minutes. So let me show you how.

First you will need to click on the the Start Menu (Vista Globe). Then select Control Panel. From here you will need to select Programs and Features in the Control Panel window.


The Programs and Features window

Now in the side panel in the window you will need to select Turn Windows Features on or off. You will then seen a window pop up with a list of a bunch of things. You will need to scroll down to Telnet Client and then put a check in the box and then click OK. From here Windows Vista will install Telnet on your system.


Windows Features window

Now you should have Telnet installed in Windows Vista. The installation may seem like it is stalled but it will install after a bit or at least it did on my machine for a little bit. Have fun with Telnet.

Friday, November 14, 2008

Removing The Background Of A Picture Using GIMP

Have you ever spent a long time trying to delete the background of a image in GIMP or Photoshop and thought that there has to be a faster and easier way. Well there is a method that I use and it seems to be pretty quick and easy enough for most of the projects that I have done. To do this I will be using GIMP so if you do not have it installed already you can get it from here: http://www.gimp.org/.

To start off you will need to open the image that you want to get rid of the background on. To do this you will just need to navigate to File > Open and then just browse to where the image is saved on your hard drive. Once you have the image open you will need to go to the Paths Tool in the Toolbox window it is the that looks like a pen. Now what you will need to do is just click on the border of the image to create a small dot. Then to create a path around the image just click around the image to create a path all the way around. Then once you click back on the first dot it will leave a open space between the last and first dot.


Image with path drawn around it

Now after you have you path around the whole image you will need to go to the Toolbox window and click on the Tool Options tab. You will then need to click on the button that says Selection From Path. This should now make your path into a selection.


Image with a Selection Path around it

Now you just have to press Ctrl + C to copy the selection then press Ctrl + V to paste the image back onto the image that you already have. Now you will have to click on the New Layer button in the Layers tab in the Toolbox window. This will now put your pasted image onto it's own layer. From here you will need to select the background layer and then click on the Delete Layer button. Now you should just have you image with no background.


Image with no background

From here you can be done or you can move on and just copy and paste this image onto another one and resize if needed. If this method does not seem work the greatest for you or if you think that you have a better way on how to do this you can post it in the comments or you can send me an e-mail at thegeekylife@gmail.com. This method does seem to work very well for me though in the past and just remember to have fun with it.


Thursday, November 13, 2008

Fully Uninstall Programs In Windows Using Revo Uninstaller

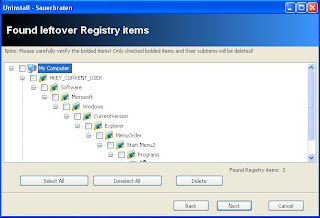
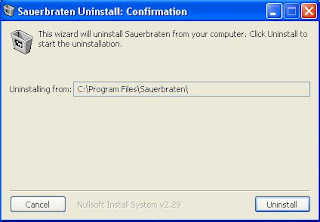
If you have ever noticed that when you uninstall a program in Windows there are usually little pieces left behind. These can sometimes be bothersome because you have thought that you already got rid of the program but it is still on your hard drive. There is a simple tool to help you through this process though and it is called Revo Uninstaller. What this little program does differently than your normal uninstall is that it will search you hard drive for the little pieces that are left behind. You can get your free copy of Revo Uninstaller here: http://www.revouninstaller.com/. So now lets take a look at what it has to offer and go through a uninstall.

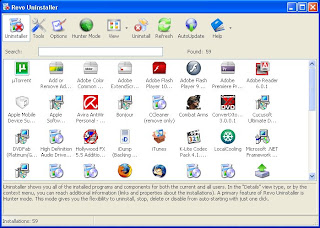
After you have installed Revo Uninstaller you will want to start it up. You should then see a list of all the programs that you have installed on your hard drive it will look kind of similar to Add and Remove Programs in the Control Panel.

The main Revo Uninstaller window

Now to uninstall a program all you need to do is click on the program that you will want to uninstall and then toward the top of the window click on the button that says Uninstall. There will then be a little dialog box that pops up asking if you are sure that you want to uninstall the program and if it is the right program then just click Yes.


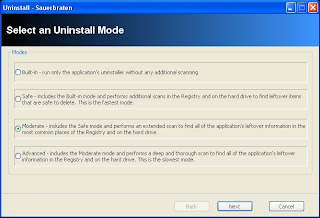
The uninstall modes window

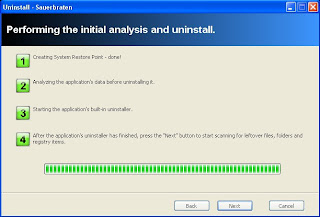
Now you should see a window that has four different uninstall modes to choose from: Built-in, Safe, Moderate, and Advanced. All of them have a little description underneath of them to explain what they do. From here you just need to choose the option that best suits your needs. I am going to select Advanced because I want to make sure that there are no remains left on my hard drive after the uninstall. After you select the option you want to use just click Next. From here it is going to create a restore point, analyze the programs data, and it will also start-up the applications built-in uninstaller (if it has one).


The start of the uninstall process


The applications uninstaller

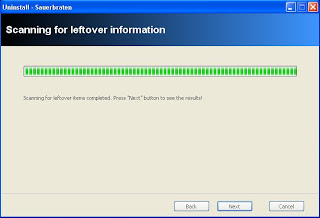
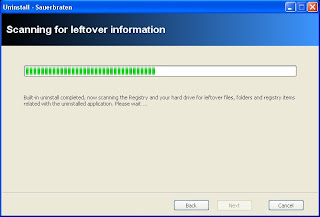
Now you will just follow the on screen directions of the applications uninstaller. When you are done running the uninstaller you will then need to click Next. This will then go to a window that starts to scan your hard drive for any left over remains from the applications uninstaller.


Scanning in progress


Scanning Finished

Once the scanning process is complete you will then need to click Next to continue on to the next screen.


List of all the registry files left over from the uninstall

From here you will need to select the registry files that you want to delete by putting a tick in the little boxes or you can just hit Select All then hit Delete. When they are all deleted you can click on Next. Now it will either proceed to a window to show the left over files if there are any or it will go a screen that says that you are now done.


Finished

Now you are done with your uninstall and there should not be any remains of the program you uninstalled left on your hard drive. You will want to be careful with this program though because if you don't look through all of the files that you are deleting you may be deleting something that is important or a system file. So use with caution if you are using the Advanced or Moderate modes. This is a very helpful tool to use and can help to keep your things more organized and also keep you hard drive clean from all of the left overs that are left on your hard drive even after you have already uninstalled the program.

Tuesday, November 4, 2008

Setting Up The Desktop Cube In Ubuntu 8.10

Setting up the Desktop Cube in Ubuntu 8.10 is very easy and quick. The cube is a very nice addition to your Ubuntu install and also is very cool and fun to show to your friends using Windows. So lets get this started.

First you will need to enable Extra in the Visual Effects settings. To do this you will need to right click on the Desktop > Change Desktop Background > Visual Effects tab. Then just click the circle that says Extra. Now just click close.


Extra Effects Enabled

You will now need to install the Compiz configuration settings manager. To do this you will need to open up the Synaptic Package Manager by navigating to System > Administration > Synaptic Package Manager. Now type Compiz in the Quick Search bar. Then mark compizconfig-settings-manager for installation. After that just hit apply and it will now download and install the package.


Synaptic Package Manager

Now you will need to navigate to System > Preferences > Compizconfig Settings Manager. Now you will need to enable the Desktop Cube by putting a check in the little box by Desktop Cube. Then a little box will come up asking if you want to Disable the Desktop Wall and you click Disable Desktop Wall. While you are still in Compizconfig Settings Manager you will also want to put a check in Rotate Cube and Cube Reflection and Deformation. Now to add caps to the cube you will need to double click on Cube Reflection and Deformation.

Cube Reflection and Deformation Settings

Now you will need to click on Appearance and it will then drop down with some settings that you can change. To change the default caps you will need to click on New for the top and bottom caps and all you need to do is browse to a image that you would like to set as the top and bottom cap for your cube.


Appearance Settings Drop Down

Now if you would like to have something other than just the cube you can navigate to the Deformation tab and then from there you can select None, Cylinder, or Sphere from the drop down menu near the top of the window.


Deformation Settings

Now you are done setting up your Cube, Cylinder, or Sphere. There are many other settings that you can play around with but the ones I have shown here are just to get you started. Now to view your new effect you can either hold down Ctrl + Alt then click on the desktop or you can click on the desktop using the middle scroll button on your mouse if you have one. So now go have fun with you new settings and customize it to how you like it.


The Cube


The Cylinder


The Sphere

Friday, October 31, 2008

Adding Themes To Rockbox

Now that I have showed you how-to install Rockbox onto your ipod (Installing Rockbox on your ipod). So now I will be showing you how to install themes and apply them to your Rockbox install.

First off you will need to go and download the themes that you would like to install on your ipod and you can get them from here: http://www.rockbox.org/twiki/bin/view/Main/WpsGallery. Then select you version of ipod from the list and search though the ones submitted until you find the one that you like and download the .zip file. After you have downloaded the theme you want you will now have to navigate to it and extract it. Now you will need to navigate to where your ipod is mounted and just drag the .rockbox folder into the .rockbox folder on your ipod it should then copy all of the files into all the places they are supposed to be. You can also do this manually if you would like by just opening up the .rockbox folder with you theme in it and just copy the files inside of the folders into the same folders on your ipod in the .rockbox folder but the above way seem more practical though. Now you have your theme installed onto your ipod. You are now going to have to apply the theme to be able to accually see it on you ipod. To do this you will need to eject your ipod from your computer and boot into Rockbox.


The main Rockbox screen

You will now need to scroll down to Settings and select it with the middle button.


The settings screen

Now you will need to scroll down to Theme Settings and select it using the middle button on the ipod.


The themes settings screen

Now for the final part you will need to select Browse Themes and then select the theme that you added to your ipod and it will apply it.


Main screen after the new theme is applied

Now you can apply tons of different themes to your Rockbox install in just a couple minutes. The theme I used for this tutorial is Black Glass AA v2. So go have even more fun with you ipod than you had before.

Thursday, October 30, 2008

Upgrading From Ubuntu 8.04 To 8.10

Ubuntu 8.10 is released today October 30th so you may be wondering if you can upgrade from your 8.04 install to the 8.10 release without a full reinstall. The answer is yes you can and it is very easy to do. So lets get this upgrade going.

First you will need to navigate to System > Administration > Software Sources. A window will come up like the one shown below.


Software sources window

You will now want to navigate to the Updates tab. Then in the Release Upgrade section in the drop down menu you will want to select Normal Releases. Then you can hit the close button.


You should have Normal Releases selected

Now you will need to navigate to System > Administration > Update Manager. You will need to click on the Check button and install any new updates (if you have any) then click the Check button again and you should then see a message that says New distribution release'8.10' is available. Now you just need to click on the Upgrade button.


8.10 upgrade screen

You will then just need to follow the on screen directions to complete the upgrade. Now you have upgraded from 8.04 to 8.10 in a very simple and quick way. So go have fun with you new upgrade of Ubuntu.

Sunday, October 26, 2008

Installing Fedora To A USB Flash Drive Using Fedora Live USB Creator

Have you ever wanted to install an Operating System onto a USB Flash drive and be able to boot from it on a different computer but thought that it looked complicated and heard that it didn't work very well? There is a Tool that makes the process to do this very simple and easy to do and it is called Fedora LiveUSB Creator. This little program makes installing Fedora to your USB device very simple.

To start off you will need to download the tool from their website here: https://fedorahosted.org/liveusb-creator.

When you download it if you are using windows it will be in a .zip file so what you will need to do is right click and select Extract All this will now create a new folder in the same place where you downloaded it to. Now open up that folder and you will see a file called liveusb-creator.exe now just double click it to start-up the program. This should now open up a little window like the one shown below.


Fedora LiveUSB Creator main screen

Now there are some options in the window that you can choose from. You can choose to hit Browse if you have already downloaded the iso image your self and you can then navigate to it and select to install from that. You can also choose a install you want from the drop down menu (which is the more common option to use).


The drop down menu with all of the
different options for different installs


I am going to choose the Fedora 9 KDE (i686) because i really like the look of KDE and I'm not going to be running my USB on a 64-bit OS. You can choose whichever you prefer.


Target Device section

Now moving on to the portion that says Target Device this is going to be the device that the program will install your Operating System to. So you will want to make sure you have the right device chosen that you will want to be doing the install onto.


Persistent Storage section

Now to the Persistent Storage section. You would use this if you would like to save things to your USB drive. If so then you will need to allocate how much space you will want to use for storage. I will be leaving mine at 0 for this install but you may want to save files and settings so I would recoment using at least some space for storage.

Now if you have all of your settings correct you can now hit the Create Live USB button at the bottom. Now you can just sit back and watch your USB Device be turned into a portable operating system (this process may take a while if you have to download the image time will vary depending on your connection speed).


The installation process

This will take some time so you may want to go do something while you are waiting. The time it takes to finish will depend on if you have downloaded your image already and what your connection speed is.


Finished Successfully

Now to boot into you new Fedora install you will need to change your BIOS settings to boot from a USB device before the hard drive (you may want to check and see if your BIOS supports booting for USB devices first before you go through with the install). Now you are done so go have some fun with you new portable operating system on a USB device.

Friday, October 24, 2008

Making Bloody Letters In GIMP

Since it is getting to be around the time of Halloween you may want add some creepy text to some of you pictures or maybe just want to make something cool for Halloween. So lets get started on this project.

Just as before you will need to have GIMP installed to understand this tutorial you can get a free copy of it here: http://www.gimp.org/

OK now you will need to start up GIMP. You will then need to navigate to File > New. A window will pop up to create the size of your new image I chose 800X400 pixels but you can choose according to what you want to make.

Create New Image Window

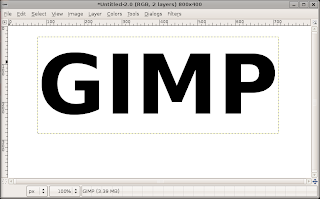
Now you should have you new image open. Now to start off we are going to simply select the Text Tool from the GIMP menu it's the one with a big A. Then you just click on any part of the image and just type what you want. I just typed GIMP for this tutorial but you can type something else and it will work just as good and if you use all capitals it seems to look and work better.


These are the letter settings that I used


This is how mine looks like so far

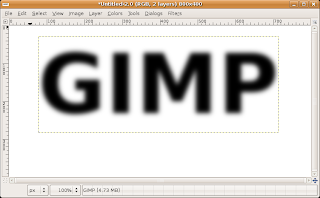
Now that we have the letters done we are going round the corners of the image. To do this we are going to add a Gaussian Blur. You will need to navigate to Filters > Blur > Gaussian Blur. A little window will come up with the settings for the Gaussian Blur tool. Just copy the settings from the image below. Then hit OK.


You should set your Gaussian Blur to 20 pixels


Image after the Gaussian Blur

Now to you need to goto the layers tab on the GIMP window and right click on the layer with your letters and select Merge Down. Now to get the rounding effect on the letters you need to navigate to Colors > Threshold. You will then want to move the slider until your letters look rounded and bigger.


The Threshold tool is used to round the sharp corners of the image

The image after the Threshold tool is applied

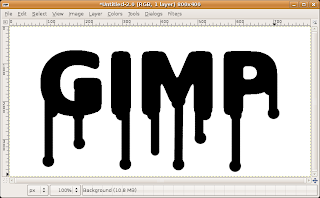
It is now time to get started on making these letter look more bloody. You will now need to click on the Brush Tool it is the one that looks like a little paint brush from the GIMP window. Now you will need to draw lines coming down from the letters to give the effect of the blood dripping down. You will then need to change the size of your brush to fit you image it will depend on how large your letters are. To make strait lines you will need to make a dot where you want the line to start then hold in the Shift Key and then draw the line to the point where you want it to stop. Your image should look somewhat like the one below.


Image shows how the lines create the blood dripping effect

To make it look more like blood dripping we are just going to make our brush a little larger. Then just add dots to the ends of the lines and in the corners where the lines start.


Shows the dots on the ends of the lines and in the corners of the letters
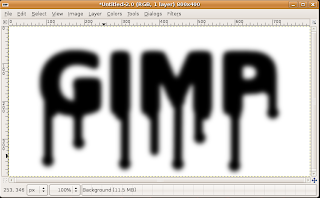
Now that the dots are done you will have to go back to the Gaussian Blur Tool (Filters > Blur > Gaussian Blur). Just use the same settings as before it should come up with the last settings used or if it doesn't put in 20 pixels.


Gaussian Blur Tool set to 20 pixels


Image after Gaussian Blur applied

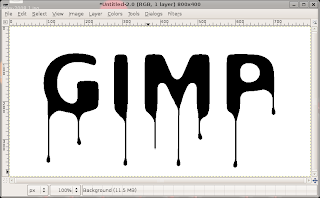
You will now need to go back to the Threshold Tool again by going to Colors > Threshold. Instead of like before when you made the letters larger and rounded the edges. You will now want to make them really skinny to give them a really nice blood effect.


Moving the slider on the Threshold Tool to the left will give you the desired effect


This is the effect you will want to get

After you have that done you will want to duplicate the background layer. To do this all you have to do is right click on the background layer then select Duplicate Layer it is toward the top. You should now have 2 identical layers. You will want to take out the white of your top layer now and the tool that you need to use is the Color Tool. Then you just click in the white space to select the white and hit the delete key to get rid of the white space. Now create a duplicate layer of the top layer by just right clicking on the layer and selecting Duplicate Layer. Now with the new top layer you are going to use the Color Tool again but select the black letters. Then you will need to click on the foreground color and choose a red that looks the most like blood (usually a darker one works best). Then you just need to drag and drop the color onto your image.


The image after you add in the red

You will now want to select your bottom background layer again. Now you have to navigate to Colors > Invert. Now you are going to go back to the Gaussian Blur Tool again Filters > Blur > Gaussian Blur. This time you will want to set it higher like around 36 or so.


Your image should look close to this depending on
how much Gaussian Blur you used


You will now be making a Bump Map this will give you a the finished blood look that you have been waiting for. You will need to select the top layer again. Then you will need to navigate to Filters > Light and Shadow > Lighting Effects. This will open a window and you will need to goto the Bump Map tab. Then put a tick in the Enable Bump Mapping and the Bump Map Image should be the bottom on the list from the drop down menu. Now you need to goto the Light tab. You will need to change the Light Type to Directional for both light 1 and light 2. Then click OK and it will just take a little while to load the Filter onto the image.


The finished image

Then you are done making your bloody letters. If you want to play around with some of the settings you can get a ton of different looks or you could try to do different colors for the blood. Just remember to have fun with it and try to do different things with it to get the effect that you desire.