Showing posts with label GIMP. Show all posts

Sunday, December 5, 2010

Put Color Back Into Your Black and White Photos

I was looking for some good Photoshop tutorials and I came across this one that shows how you can put color back into your black & white photos. This could be very useful if you have a lot of black & white pictures or just a fun thing to do. Also this tutorial will show you what you can do with some of the tools.

http://fx.worth1000.com/tutorials/161018/tutorial

Also here are some other Tutorials for Gimp and Photoshop. Some I have written some I didn't (should be clear which ones).

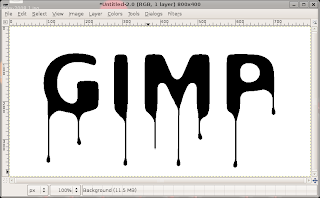
http://thegeekylife.blogspot.com/2008/10/making-bloody-letters-in-gimp.html


http://thegeekylife.blogspot.com/2008/11/removing-background-of-picture-using.html

http://www.mydamnchannel.com/You_Suck_at_Photoshop/Season_1/YouSuckAtPhotoshop1DistortWarpandLayerEffects_1373.aspx

http://www.mccannas.com/pshop/photosh0.htm

Sunday, September 26, 2010

Top 10 Freeware Programs

This is a list of the top 10 freeware programs that I use on a day to day basis. This list might have some stuff you already know of because some of these are pretty known but there should be some new ones too. Also if you have suggestions on things you use leave a message in the comments below. So without further ado lets get this started.

1. The most used freeware program I use is the Firefox browser. I really like this browser and have been using it for the past 3-4 years and has been great since day one. Firefox is cool because of all the add-ons and tweaks you can do to it. Thus creating a personalized environment for the user.

2. Google Chrome is another browser that I use. I haven't been using Chrome that long yet but really like how fast it is and how you can search Google.com right out of the search bar. Also the reason that I like to use two browsers is that somethings work better in other browsers.

3. XBMC or formally know as Xbox Media Center and thats just what it is a media center. One of the main reasons that I use XBMC is that I wanted a way to be able to watch movies across my home network on my television using a PS3. I like this program but one problem that I run across while using it on the pc is it uses a lot of cpu power to run so it can get a bit slow at times. It works good across the network to a PS3 or Xbox and you can stream pictures and music too.

4. iTunes music player is one that I use on the daily the one reason that I started using iTunes was because I bought a iPod and needed it to put music on it. Later down the road I seemed to like it more and more but right now it is getting a bit bogged down but still runs fine on older machines. I also like how iTunes can share it's library with other iTunes running on different pc's over the network thus only having to save your library on one computer.

5. Avira Antivir Personal anti-virus is a great free virus scanner. I really like how user friendly it is and updates and scans all on its own through scheduling that you setup. Also it's always looking for things that are suspicious and asks you about it.

6. Format Factory is a file conversion program for just about all media file types. I use this program for just about all file converting that I do. This is one program that comes very handy when you have file types that wont work in certain programs and changed into a format the program can read.

7. Gimp image editing software is a very powerful program that needs little resources to run on and compares to Adobe Photoshop in what you can do in the program. I have been using both Photoshop and Gimp for awhile but almost seem to like Gimp better. Gimp just seems to be easier to do things and get great effects.

8. CCleaner is a great little program to help you system out by doing a bit of cleaning and getting rid of things that are bogging your system down or just to tidy up. CCleaner has many different options that you can choose from and other features that are helpful like adjusting the programs on start up to uninstalling unused programs.

9. Revo Uninstaller is a great tool for fully uninstalling programs because it searches your hard disk to find all of the stuff that the programs uninstaller left behind. There are 3 different modes to choose from according to how you would like to scan your system after the uninstall is complete.

10. VLC Media Player is a very lite program for playing media files of all different types. I mainly use this program for watching movies because I have iTunes for all my musical needs. I like how I can watch so many different file types under one piece of software and it doesn't need very many resources from your computer so it can be used even on outdated machines.

There you have it a full list of 10 free programs that you should check out if you haven't already or give them another chance. This is just a list of things that I have found and really like and use all of the time and have worked great for me. If you want to add something you think I should check out or have something you would like to voice throw down a comment down below.

Friday, November 14, 2008

Removing The Background Of A Picture Using GIMP

Have you ever spent a long time trying to delete the background of a image in GIMP or Photoshop and thought that there has to be a faster and easier way. Well there is a method that I use and it seems to be pretty quick and easy enough for most of the projects that I have done. To do this I will be using GIMP so if you do not have it installed already you can get it from here: http://www.gimp.org/.

To start off you will need to open the image that you want to get rid of the background on. To do this you will just need to navigate to File > Open and then just browse to where the image is saved on your hard drive. Once you have the image open you will need to go to the Paths Tool in the Toolbox window it is the that looks like a pen. Now what you will need to do is just click on the border of the image to create a small dot. Then to create a path around the image just click around the image to create a path all the way around. Then once you click back on the first dot it will leave a open space between the last and first dot.


Image with path drawn around it

Now after you have you path around the whole image you will need to go to the Toolbox window and click on the Tool Options tab. You will then need to click on the button that says Selection From Path. This should now make your path into a selection.


Image with a Selection Path around it

Now you just have to press Ctrl + C to copy the selection then press Ctrl + V to paste the image back onto the image that you already have. Now you will have to click on the New Layer button in the Layers tab in the Toolbox window. This will now put your pasted image onto it's own layer. From here you will need to select the background layer and then click on the Delete Layer button. Now you should just have you image with no background.


Image with no background

From here you can be done or you can move on and just copy and paste this image onto another one and resize if needed. If this method does not seem work the greatest for you or if you think that you have a better way on how to do this you can post it in the comments or you can send me an e-mail at thegeekylife@gmail.com. This method does seem to work very well for me though in the past and just remember to have fun with it.


Friday, October 24, 2008

Making Bloody Letters In GIMP

Since it is getting to be around the time of Halloween you may want add some creepy text to some of you pictures or maybe just want to make something cool for Halloween. So lets get started on this project.

Just as before you will need to have GIMP installed to understand this tutorial you can get a free copy of it here: http://www.gimp.org/

OK now you will need to start up GIMP. You will then need to navigate to File > New. A window will pop up to create the size of your new image I chose 800X400 pixels but you can choose according to what you want to make.


Create New Image Window

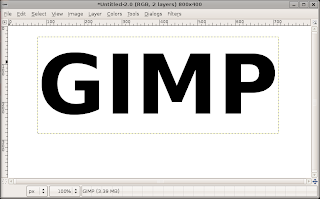
Now you should have you new image open. Now to start off we are going to simply select the Text Tool from the GIMP menu it's the one with a big A. Then you just click on any part of the image and just type what you want. I just typed GIMP for this tutorial but you can type something else and it will work just as good and if you use all capitals it seems to look and work better.


These are the letter settings that I used


This is how mine looks like so far

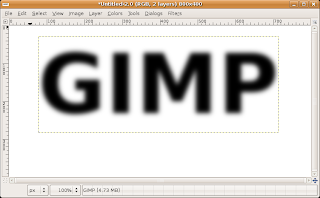
Now that we have the letters done we are going round the corners of the image. To do this we are going to add a Gaussian Blur. You will need to navigate to Filters > Blur > Gaussian Blur. A little window will come up with the settings for the Gaussian Blur tool. Just copy the settings from the image below. Then hit OK.


You should set your Gaussian Blur to 20 pixels


Image after the Gaussian Blur

Now to you need to goto the layers tab on the GIMP window and right click on the layer with your letters and select Merge Down. Now to get the rounding effect on the letters you need to navigate to Colors > Threshold. You will then want to move the slider until your letters look rounded and bigger.


The Threshold tool is used to round the sharp corners of the image

The image after the Threshold tool is applied

It is now time to get started on making these letter look more bloody. You will now need to click on the Brush Tool it is the one that looks like a little paint brush from the GIMP window. Now you will need to draw lines coming down from the letters to give the effect of the blood dripping down. You will then need to change the size of your brush to fit you image it will depend on how large your letters are. To make strait lines you will need to make a dot where you want the line to start then hold in the Shift Key and then draw the line to the point where you want it to stop. Your image should look somewhat like the one below.


Image shows how the lines create the blood dripping effect

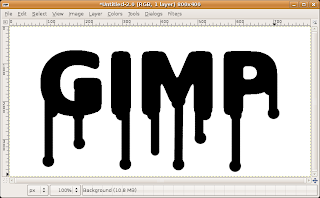
To make it look more like blood dripping we are just going to make our brush a little larger. Then just add dots to the ends of the lines and in the corners where the lines start.


Shows the dots on the ends of the lines and in the corners of the letters

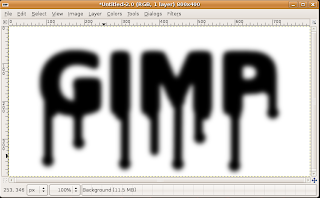
Now that the dots are done you will have to go back to the Gaussian Blur Tool (Filters > Blur > Gaussian Blur). Just use the same settings as before it should come up with the last settings used or if it doesn't put in 20 pixels.


Gaussian Blur Tool set to 20 pixels


Image after Gaussian Blur applied

You will now need to go back to the Threshold Tool again by going to Colors > Threshold. Instead of like before when you made the letters larger and rounded the edges. You will now want to make them really skinny to give them a really nice blood effect.


Moving the slider on the Threshold Tool to the left will give you the desired effect


This is the effect you will want to get

After you have that done you will want to duplicate the background layer. To do this all you have to do is right click on the background layer then select Duplicate Layer it is toward the top. You should now have 2 identical layers. You will want to take out the white of your top layer now and the tool that you need to use is the Color Tool. Then you just click in the white space to select the white and hit the delete key to get rid of the white space. Now create a duplicate layer of the top layer by just right clicking on the layer and selecting Duplicate Layer. Now with the new top layer you are going to use the Color Tool again but select the black letters. Then you will need to click on the foreground color and choose a red that looks the most like blood (usually a darker one works best). Then you just need to drag and drop the color onto your image.


The image after you add in the red

You will now want to select your bottom background layer again. Now you have to navigate to Colors > Invert. Now you are going to go back to the Gaussian Blur Tool again Filters > Blur > Gaussian Blur. This time you will want to set it higher like around 36 or so.


Your image should look close to this depending on
how much Gaussian Blur you used


You will now be making a Bump Map this will give you a the finished blood look that you have been waiting for. You will need to select the top layer again. Then you will need to navigate to Filters > Light and Shadow > Lighting Effects. This will open a window and you will need to goto the Bump Map tab. Then put a tick in the Enable Bump Mapping and the Bump Map Image should be the bottom on the list from the drop down menu. Now you need to goto the Light tab. You will need to change the Light Type to Directional for both light 1 and light 2. Then click OK and it will just take a little while to load the Filter onto the image.


The finished image

Then you are done making your bloody letters. If you want to play around with some of the settings you can get a ton of different looks or you could try to do different colors for the blood. Just remember to have fun with it and try to do different things with it to get the effect that you desire.

Wednesday, October 22, 2008

Intro To The GIMP Image Editor

Have you ever wanted to make those really cool looking photos that others make in Photoshop but don't want to throw down that much cash to do it. Well as with most things there are free alternatives that you can turn to. GIMP (GNU Image Manipulation Program) is a image editor and a very powerful one at that it can do most everything that the highest version of Photoshop can do at the nice price of Free. If you already know how to use Photoshop or have used it many things are very similar which make it very easy to learn and if you have never used it before then this is a good place to start too. So lets get started.

1. If you are using Linux you will probably already have GIMP installed or you can install it from your package manager. If you are on Windows or Mac you will need to download and install it from here: http://www.gimp.org/

2. Now to get started open up your GIMP. It should load up with a Tip Of The Day window and also a tool bar window. Now to open up a image that we would like to edit we just goto the tool bar window and navigate to file > open. From here you just browse to the image you would like to open and simply click open and it should open you picture in a new separate window.


It should look something like this

3. Now to start editing the image. Lets start with something that everyone will use.

Cropping Tool: To open up your cropping tool right click on your image > Tools > Transform Tools > Crop (shift + C if you like using hot keys). Now you just click and drag the area that you would like to crop. The light area will be what your image will look like after you crop it and the darker area will be the part that will get cut off. If you need to adjust the area just click and drag the edges to where you would like them to be. When you are done and you want to accept the changes you just hit enter.


Before the crop and after the crop

Brightness and Contrast: This is a very simple tool to use and also a very common tool. You can navigate to this tool by right clicking on the image again > Colors > Brightness and Contrast. Then a small window will pop up with some sliders for you brightness and your contrast. To make the image brighter just drag the brightness slider to the right and drag to the left to make it darker. You should see your image changing when you are moving the sliders around if it is not you make need to put a tick in the preview box. Then when you have your values that you want you just click OK to apply the changes.


Brightness and contrast pop up box

Those are just a small portion of the tools that come with GIMP but if you play around with it a bit you will be able to learn to do a ton of different things. The tools listed above should just get you started with cleaning up some of your photos that you have taken. If you would like to learn more about GIMP you should take a look at these tutorials here: http://meetthegimp.org/. I have learned a wealth of information from those tutorials. Just remember to have fun and be creative.