Showing posts with label Free. Show all posts

Tuesday, December 28, 2010

Free Beats, Loops, Samples, Acapellas, and More

I have found this site called Looperman it is a very good site if you are looking for some beats or loops and the are all free to use. This site works by users generating material and posting for others to use with their musical works or whatever they are using them for. I particularly because they have quite a large selection and there is a pretty defined search engine to help you find just what you are looking for. They one drawback with sites like these are that you will need to create a free account to enable you to download things. I find that this site is very useful and use it fairly often to create my music.

http://www.looperman.com/index.php

Wednesday, November 24, 2010

Open Source Windows Programs

The Site I Found While browsing has a very good list of Open-Source Windows programs. If you don't know what open source is you can learn more here: http://en.wikipedia.org/wiki/Open_source.

http://www.opensourcewindows.org/

Another site that has a lot of good "Free" (Non-Open Source) programs.

http://www.filehippo.com/

Tuesday, November 23, 2010

A Great Site For Uploading Your Own Music.

SoundCloud is a very good website that lets you upload songs or other audio tracks for free and stores them in your very own little account. You can from there share your tracks with whoever you so choose and you can also view other tracks that other people have created. It is very user friendly and uploads your tracks so fast that they will be done before you can fill in all the info. A very good site to check out if you are looking to get your music out or just looking to find so new music.

http://www.soundcloud.com

you can check out some of my created works here:

http://soundcloud.com/

Sunday, September 19, 2010

Listen To Any Song For Free With Grooveshark

Grooveshark is a site that works kind of the same way as Pandora Radio works but you can select the songs that you want to listen to and not just listen to things like your song played in a radio fashion. Grooveshark also has this feature but you need to turn it on. All you need to do is search and your ready to be listening in no time. Go there now and start listening to all of your favorite songs all at your fingertips.

Sunday, September 6, 2009

Linux Wallpapers

These are some Linux Desktops that I have created. You can just right click them and choose Save Image As. Also for a larger version of the images you can just click on them to see the larger version and all images are at 1280X800 resolution but if you would like to have it in a different size I could resize to another resolution.

(Click on image to view larger version)


(Click on image to view larger version)


(Click on image to view larger version)

Monday, May 25, 2009

DIY Indoor Lighting Using 2-Liter Bottles


This seems like it would be a great idea to use in a garage or a shed. Also a very good solution to save money on lighting during the day.

Sunday, May 24, 2009

Free Independent Lord Of The Rings Film

This is for all of the Lord Of The Rings enthusiasts out there. It is a film that was inspired by the Lord Of The Rings books and movies. It is a very good film if you are into those kinds of movies and it is free to watch.


You can watch the film for free here: http://thehuntforgollum.com/

Thursday, February 5, 2009

See Your Games Frame Rates Using Fraps

Have you ever wondered what your frame rate (FPS) is while you are playing games? Well just like most other things there is a small free program that can do this for you and it is called: Fraps. You can download your free copy of Fraps from here: http://www.fraps.com/. If you are wondering what all of this talk about frame rate (Fps) is you can visit this wiki page: http://en.wikipedia.org/wiki/Frame_rate#Frame_rates_in_video_games. That page can explain it in a lot more detail than I would be able to.

Now all that you will need to do is install the program after you have downloaded it. You will then need to run it and the main window should look like something similar to the image below.


Fraps Main Screen

Once you have Fraps open you will have a couple options on the main screen like to start the program minimized to the system tray, or keep the Fraps window on top of all other windows, and also a option to start Fraps when Windows starts.


Fraps Icon In The System Tray

If you then goto the FPS tab you can change some settings in there too if you would like to but most of those options are fine the way they are unless you prefer them to be different. The one option that you may want to change is where the frame rate will be shown in your gaming window. You can do this by clicking on the little circles in the Overlay Corner portion or the Fraps window.


Overlay Corner

In the Movies tab there really isn't much that you will really need to change either. You may want to change where your output video will be saved though. This can be done by just clicking on the Change button toward the top of the window on the right side. You will then need to browse to where you want your movies to be saved.


Changing Directory Of Saved Movies

Now in the Screenshots tab you may want to change a couple of different things. You can change the output directory just like you can with the movies, but you can also now change what file format you want the pictures to be in (you can only do this is you get the full version). You can change them to: BMP, JPG, PNG, or TGA. You can change the output format by selection the button next to the option you want. You can also put a check in the box that says Include Frate Rate Overlay On Screenshots so that the frate rate will show up in your screenshots.


Screenshot File Output Options

That is an overview of just the main options that you have while using this program. Now to see your frame rate in your games you will just need to keep Fraps running and then just start up the game that you would like to play. You should then be able to see your frame rate in one of the corners that you selected.

In Game Screenshot

Screenshot from the game Combat Arms which is a free First-Person Shooter and can be downloaded from here: http://combatarms.nexon.net/Intro.aspx

Tuesday, January 20, 2009

Top 5 Free iPod Touch/iPhone Games

Seeing as the iPhone and the iPod Touch are some of the hottest gadgets out right now I thought that I would make a list of my favorite free games that are available in the App Store. I am hoping that from me making a list of my favorite games I can save you some time in searching through the thousands of apps in the App Store.

All of the apps listed below can be found either searching in the App Store on the device or searching the iTunes Store in iTunes.

5. Dactyl:
This is a game where you have to touch bombs to defuse them so that they don't blow up but you also can't touch the other bombs that aren't lit or the others will blow up and you then lose. The point of the game it to see how many you can defuse before you make a mistake.

4. MarbleMash: In this game what you have to do is guide a ball through a maze of walls and holes that you can fall through. The point is to get through the maze to this little bear. It can be a very time consuming game with tons of levels so you will never get bored.

3. iShoot Lite: This is mainly a game of strategy and angles. What happens is you are a small tank that is trying to blow up the opposing tanks by lobbing different sorts of missiles. To win you have to get the best score out of 5 rounds.

2. FallingBalls: I have to admit that when I first seen this game I really didn't think that it would be that fun, but I was obviously very wrong indeed. In this game you are a little stick person that has to run away from these balls that fall from the sky. You get points when the balls bounce off of the screen. The main goal is to just see how many you can dodge before you get squashed.

1. Topple: This is a very fun and interesting game. What you do is you have to stack these blocks and try to get them to a certain height without them falling over before the timer runs out. The higher that you can stack the blocks in the time given will give you a better end score.

Well that is just my Top 5 List of games that I have found to be the most fun so far. I am in no way saying that this is an official list but more of a helpful guide. If you have any apps that you would like to suggest for me to try out or suggest to others I would love to hear about them in the comments or you can send me an E-mail at thegeekylife@gmail.com.

Saturday, January 10, 2009

Monitor System Temps With SpeedFan

Ever wondered what the temperature of your computer actually is when it's running? Well there is a free program called SpeedFan that can monitor your system temperatures. You can Download it from here: http://www.almico.com/speedfan.php. Once you have it downloaded just install it and run it. Now you should be able to see the different temperatures of certain areas in your computer.


SpeedFan Main Window


SpeedFan Notification tray Icon

If you go through the different tabs you can see some of the other things that SpeedFan has to offer. If you go into Configure there are a bunch of options in there like changing the icon color or setting up the temperature ranges for areas. This can be a very handy program especially if you are building a computer and want to know if you have adquate cooling in your machine. This program can be used as either an advanced tool or it can be used as just a normal users tool too. If you have any questions/feedback or would like to have a more indepth view of this program just leave a comment below.

Saturday, December 20, 2008

Open Source Alternative To Microsoft Office

Do you use Microsoft Office in your daily life at work or school but don't have it installed on your home computer because it is too expensive? Well like most other things there is a free alternative to this and it is called OpenOffice.org. This office suite has everything that you will need from writing papers to creating data bases and everything in between that you would need in a office suite. You can download your free copy from here: http://www.openoffice.org. OpenOffice.org has a very nice interface so that if you have used any of the Microsoft Office programs before everything should look very similar or even close to the same. You can also save your files to all of the same formats that a ton of the other office programs use. So you can still send your files to whom ever and they will be able to read them just fine with the programs that they have installed. So if you need an office suite OpenOffice.org is a very good alternative to the Microsoft Office suite if you want to go open source and not have to pay any money.


OpenOffice.org Writer


OpenOffice.org Impress


OpenOffice.org Draw


OpenOffice.org Calc


OpenOffice.org Base

Friday, November 14, 2008

Removing The Background Of A Picture Using GIMP

Have you ever spent a long time trying to delete the background of a image in GIMP or Photoshop and thought that there has to be a faster and easier way. Well there is a method that I use and it seems to be pretty quick and easy enough for most of the projects that I have done. To do this I will be using GIMP so if you do not have it installed already you can get it from here: http://www.gimp.org/.

To start off you will need to open the image that you want to get rid of the background on. To do this you will just need to navigate to File > Open and then just browse to where the image is saved on your hard drive. Once you have the image open you will need to go to the Paths Tool in the Toolbox window it is the that looks like a pen. Now what you will need to do is just click on the border of the image to create a small dot. Then to create a path around the image just click around the image to create a path all the way around. Then once you click back on the first dot it will leave a open space between the last and first dot.


Image with path drawn around it

Now after you have you path around the whole image you will need to go to the Toolbox window and click on the Tool Options tab. You will then need to click on the button that says Selection From Path. This should now make your path into a selection.


Image with a Selection Path around it

Now you just have to press Ctrl + C to copy the selection then press Ctrl + V to paste the image back onto the image that you already have. Now you will have to click on the New Layer button in the Layers tab in the Toolbox window. This will now put your pasted image onto it's own layer. From here you will need to select the background layer and then click on the Delete Layer button. Now you should just have you image with no background.


Image with no background

From here you can be done or you can move on and just copy and paste this image onto another one and resize if needed. If this method does not seem work the greatest for you or if you think that you have a better way on how to do this you can post it in the comments or you can send me an e-mail at thegeekylife@gmail.com. This method does seem to work very well for me though in the past and just remember to have fun with it.


Thursday, November 13, 2008

Fully Uninstall Programs In Windows Using Revo Uninstaller

If you have ever noticed that when you uninstall a program in Windows there are usually little pieces left behind. These can sometimes be bothersome because you have thought that you already got rid of the program but it is still on your hard drive. There is a simple tool to help you through this process though and it is called Revo Uninstaller. What this little program does differently than your normal uninstall is that it will search you hard drive for the little pieces that are left behind. You can get your free copy of Revo Uninstaller here: http://www.revouninstaller.com/. So now lets take a look at what it has to offer and go through a uninstall.

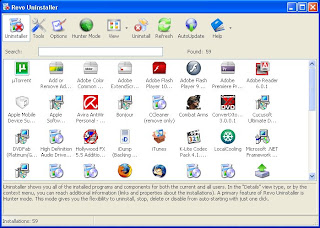
After you have installed Revo Uninstaller you will want to start it up. You should then see a list of all the programs that you have installed on your hard drive it will look kind of similar to Add and Remove Programs in the Control Panel.

The main Revo Uninstaller window

Now to uninstall a program all you need to do is click on the program that you will want to uninstall and then toward the top of the window click on the button that says Uninstall. There will then be a little dialog box that pops up asking if you are sure that you want to uninstall the program and if it is the right program then just click Yes.


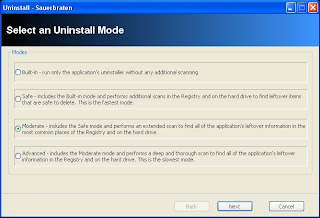
The uninstall modes window

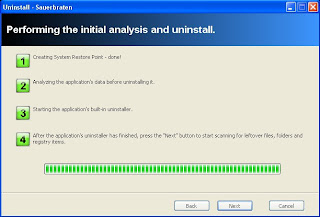
Now you should see a window that has four different uninstall modes to choose from: Built-in, Safe, Moderate, and Advanced. All of them have a little description underneath of them to explain what they do. From here you just need to choose the option that best suits your needs. I am going to select Advanced because I want to make sure that there are no remains left on my hard drive after the uninstall. After you select the option you want to use just click Next. From here it is going to create a restore point, analyze the programs data, and it will also start-up the applications built-in uninstaller (if it has one).


The start of the uninstall process


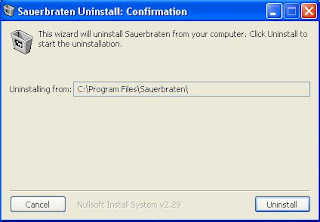
The applications uninstaller

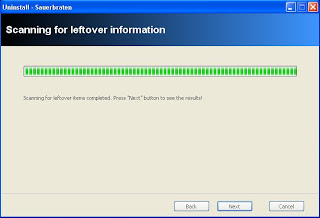
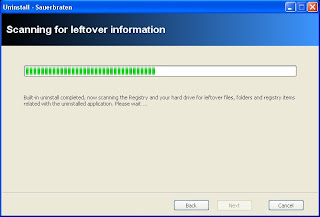
Now you will just follow the on screen directions of the applications uninstaller. When you are done running the uninstaller you will then need to click Next. This will then go to a window that starts to scan your hard drive for any left over remains from the applications uninstaller.


Scanning in progress


Scanning Finished

Once the scanning process is complete you will then need to click Next to continue on to the next screen.


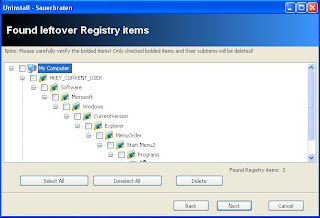
List of all the registry files left over from the uninstall

From here you will need to select the registry files that you want to delete by putting a tick in the little boxes or you can just hit Select All then hit Delete. When they are all deleted you can click on Next. Now it will either proceed to a window to show the left over files if there are any or it will go a screen that says that you are now done.


Finished

Now you are done with your uninstall and there should not be any remains of the program you uninstalled left on your hard drive. You will want to be careful with this program though because if you don't look through all of the files that you are deleting you may be deleting something that is important or a system file. So use with caution if you are using the Advanced or Moderate modes. This is a very helpful tool to use and can help to keep your things more organized and also keep you hard drive clean from all of the left overs that are left on your hard drive even after you have already uninstalled the program.